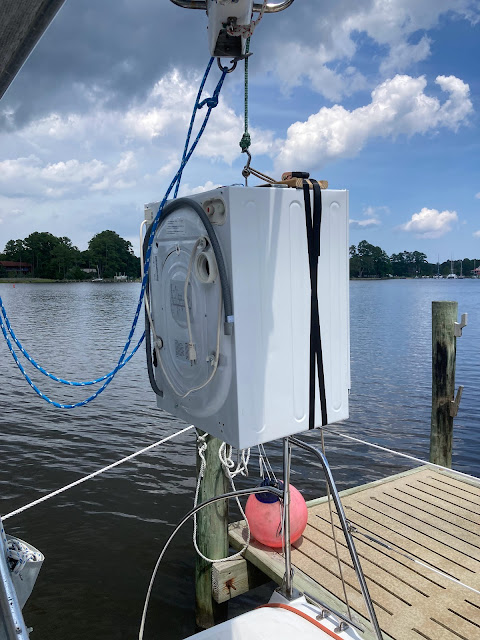
It's time for a long story.....replacing our Splendide washer/dryer.....
This little all-in-one-combo washer/dryer has been a wonderful appliance. I know some folks wash their clothes in a bucket, but this machine does such a good job it's worth the space and trouble. But the washer was original to the boat and on it's last leg....
Here's a view from inside the cubbyhole....incredibly rusty back there!
Duane removed anything that could be removed to lighten the load. (This little baby weighs 148 pounds....)
He also removed a couple of pieces of concrete to take even more weight off. (These apparently are ballast for the high-efficency spin cycle).
The unit measures about 20.5". And the bare doorways measure...you guessed it....about 20.5". (We had to remove all the doors and trim work.
Since the old one was much lighter, we were able to just carry it up into the cockpit area.
Then we just used to halyard to lift it off the boat onto the dock for disposal.
Fast forward a bit....you may remember that we found a deal for a brand new, never installed Splendide unit from a young RV couple in Winston-Salem a few months ago.
We'd taken that home and tested it out in our laundry room. Perfect!
This eyebolt will be important to lift and position this heavy unit in the confines of the boat.
At the boat, we used the same halyard to lift the new unit onto the boat deck. This one pretty much weighs the full 148 pounds because we can't really remove anything heavy from it!
Now that we have the unit on the boat, we will move it to the interior using a 10' piece of Uni-Strut from Lowe's and a handy roller mechanism.
Here's what the roller looks like in there.
We used combinations of halyards and lines tied to overhead structures to easily move the unit.
Note the small table in this photo. We used it several times to support the unit while we re-positioned the Uni-Strut.
At each "turn" we untied the Uni-Strut and tied it back at 90 degrees.
I'll stop here to show that Duane had to use the router to shave off about 1/8" of the Nida-core partition because the unit just simply would not squeeze thru without hurting/scratching it. Messy business in the confines of the boat!!! (no worries about the trimming - the nice aluminum framework when re-installed will easily hide the trimmed area.)
This photo shows how we attached the Uni-Strut.
Sliding into the main cockpit door was no trouble because it is wide enough. (We did have to remove the screen door).
Getting ready for the turn down the steps. We placed that same small table for the unit to rest on at the bottom of the stairs.
Rigged and ready for this next segment. Note that we stacked some boards on the countertop to give us enough height.
Squeezing down the stairs. Also note that we have a wonderful stainless bar over the companionway going down into the berth. We used this to attach the Uni-Strut. If you don't have that you'd have to rig another support here.
Setting at the bottom of the steps while we re-rig the Uni-Strut thru the hatches with halyards.
This shows the tight squeeze thru the doorway. (Note that he had removed the glass door on the unit here as well.)
Using the Uni-Strut to move it into the forward berth. If you look closely, there is a red-painted 2x4 standing vertical screwed and held in place by a 2x6 in the shower floor. This is the one place that we had to use a prop to support the Uni-Strut because there was no other way to support it from above here.
More re-positioning of the Uni-Strut. The table was handy!
The final move into the forward berth using the Uni-Strut.
We placed the unit on the berth to re-assemble and get ready to put it back into the "cubby" using all new ducts and hoses of course.
Duane spent a good bit of time cleaning up the cubby and installing new hoses, of course. (He also moved a watermaker pump from the area which was the likely source of a small amount of salt water, hence all the rust). This area is all hidden after the washer is installed.
Nothing fancy to get it back into the cubby - just used a halyard to pick it up and a line attached to the bottom swing it over into the empty cubby.
Then all the buttons, trim and door were re-installed.
A fresh coat of varnish on the teak trim and we're all set to do a test load. Perfect and no muscles were strained in the process!! Good for another 25 years, knock wood!!
.HEIC)
.JPG)
.JPG)
.HEIC)
.HEIC)
.HEIC)
.HEIC)
.HEIC)
.JPG)


.HEIC)
.HEIC)
.HEIC)

.HEIC)
.HEIC)

.HEIC)
.HEIC)
.HEIC)
.HEIC)
.HEIC)
.HEIC)
.HEIC)
.HEIC)
.HEIC)
.HEIC)
.HEIC)
.HEIC)
.HEIC)
.HEIC)
.jpg)
.HEIC)
.HEIC)
.HEIC)
.HEIC)
.jpg)
.jpg)
.jpg)
.jpg)


Wow, what a process! Total time of all this activity? Nice to have a washer on board. Janet and Tom
ReplyDeleteNicely documented process. Great job "imagineering" the steps to get it in.
ReplyDeleteHey Tom & Janet - hope you guys are well! This was over the course of several days due to travels and whatnot. In compressed time it probably could have been accomplished in a very long day. Karen
ReplyDelete1 long Duane Work Day = 3 normal people work days
ReplyDeleteWow, what a mission. Well done on the planning and execution of the installation.
ReplyDelete